Introduction #
This guide provides step-by-step instructions for adding your Chatbotbuilder.Net widget to your website. You’ll learn how to access your embed code, implement it on your site, personalize conversations with user data, and control the chatbot using JavaScript. Whether you’re a business owner with no technical background or a developer looking for advanced options, you’ll find everything you need to get your chatbot up and running quickly. Here’s how different businesses are embedding chatbotbuilder.net chatbots to transform their customer interactions:
A. E-commerce Website: Fashion retailers can add a chatbot to help shoppers find products and answer sizing questions. This can result in 35% fewer abandoned carts and a 28% increase in average order value as customers can easily find what they need faster.
B. Professional Services: Law firms can implement a chatbot to prequalify leads and schedule consultations. They can witness upto 45% increase in qualified leads and a reduction in scheduling staff workload by 20 hours per week.
C. SaaS Company: Software companies can use their chatbot to provide instant technical support for common issues. This reduces their support ticket volume and improve customer satisfaction scores.
D. Healthcare Provider: Healthcare providers can deploy a chatbot to handle appointment scheduling and basic health questions. This reduces phone wait times and can free up staff to focus on in-office patient care.
This guide is designed for:
- Website owners who want to add a chatbot to their site
- Developers implementing the technical integration
- Marketers looking to improve website engagement
- Customer support teams seeking to automate repetitive inquiries
No coding experience is required for basic implementation, though some examples include JavaScript for advanced functionality.
What this guide covers? #
This guide explains how to:
- Access your unique chatbot embed code
- Add the chatbot to your website with just a few lines of code
- Personalize the chatbot with user information
- Control the chatbot’s behavior with JavaScript
- Customize the chatbot’s appearance
- Troubleshoot common issues
Why add a chatbot to your website? #
A chatbot can transform how you interact with your website visitors by:
- Providing 24/7 customer support without human intervention
- Answering common questions instantly, freeing up your team’s time
- Generating leads by collecting visitor information
- Guiding users through your products or services
- Reducing support costs while improving customer satisfaction
- Gathering valuable insights about customer needs and pain points
Step by step instructions #
Already created your chatbot and ready to add it to your website? This section explains how to quickly locate your unique embed code within your ChatbotBuilder account and implement it on your website. In just three steps, you’ll access your personalized code and make your chatbot live for your visitors.
A. Get Your Embed Code
- Open the respective content in Build mode, and navigate to the Channels tab.
- Under Channels navigate to the Chatbot sub tab, and Chatbot Embed Details section.
- Under Welcome Screen, you will see the JavaScript code under Chat Embed Details.
- Click on Copy to copy the embed code to the clipboard.
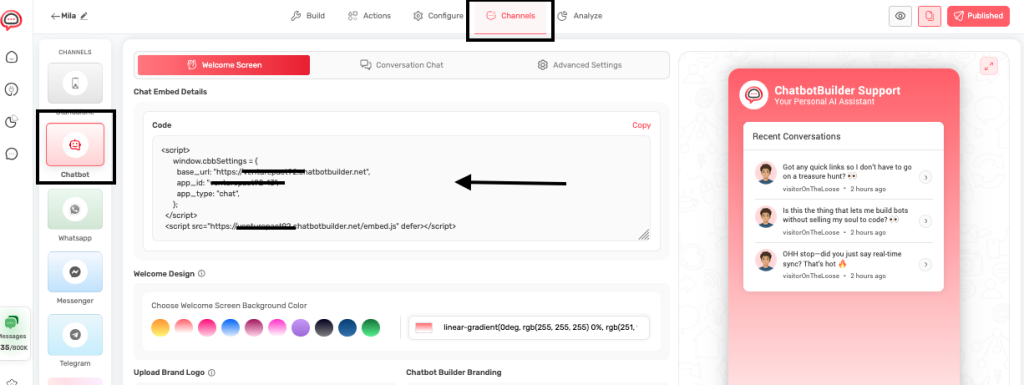
- Not it’s time for you to add the copied embed code to your website.
- You can open your website’s HTML editor or CMS to add the code. Find the closing
</body>tag and paste the code just before the </body> tag. Make sure you click on Save / Publish to save the changes. - Once the code is added, open your website in a new browser window. Look for the chat icon in the bottom right corner.
- Click the icon to test the chat functionality, and to verify that the bot responds correctly. NOTE: Here is an example of the section in which you need to add the embed code on your website.
<html>
<head>
  <!-- Your head content -->
</head>
<body>
  <!-- Your website content -->

  <!-- PLACE EMBED CODE HERE -->
  <script>
    window.chatbotApi = { ... };
  </script>
  <script src="...embed.js" defer></script>

</body>
</html>
Adding your chatbot to different website platforms #
Once you have your embed code, you’ll need to add it to your website. The exact process varies depending on which platform your website is built on. Follow the instructions below for your specific platform.
WordPress
WordPress offers several methods to add your chatbot code:
A. Using the Theme Editor:
- Log in to your WordPress admin dashboard
- Navigate to Appearance > Theme Editor
- Select your active theme’s footer.php file from the right sidebar
- Locate the closing
</body>tag in the code - Paste your chatbot embed code directly before this closing tag
- Click Update File to save your changes
B. Using a Child Theme:
- If you’re using a child theme, edit the child theme’s footer.php file
- Add your code before the
</body>tag - This approach ensures your changes won’t be lost during theme updates
C. Using a Plugin (Recommended for Beginners):
- Install and activate the free “Insert Headers and Footers” plugin
- Go to Settings > Insert Headers and Footers
- Paste your chatbot code into the Footer section
- Click Save to apply the changes
- This method is safer and doesn’t require editing theme files directly
Shopify
Shopify stores can add the chatbot using these methods:
A. Editing Theme Files:
- From your Shopify admin, go to Online Store > Themes
- Find your active theme and click Actions > Edit code
- Locate and open the theme.liquid file
- Find the closing
</body>tag near the bottom of the file - Paste your chatbot embed code directly before this tag
- Click Save to apply your changes
B. Using Code Injection in Settings:
- From your Shopify admin, go to Online Store > Themes
- Click Customize on your active theme
- Click Theme settings (usually at the bottom left)
- Look for Custom code or Advanced settings
- Paste your code in the Footer section
- Save your changes
Squarespace
Squarespace makes it easy to add custom code:
- Log in to your Squarespace account
- Go to Settings > Advanced > Code Injection
- Scroll down to the Footer section
- Paste your chatbot embed code into this area
- Click Save to apply the changes
- Your chatbot will now appear on all pages of your site
Wix
Wix offers a few different ways to add your chatbot:
A. Using the HTML Element:
- In the Wix Editor, click the + (Add) button
- Search for “HTML” or find it under Embed
- Select HTML Code and drag it to your desired location
- Click the element to open the settings
- Paste your chatbot embed code into the HTML box
- Click Update to save your changes
B. Using Site-Wide Code Injection:
- In your Wix dashboard, go to Settings > Advanced > Custom Code
- Click + Add Custom Code
- Give your code a name (e.g., “Chatbot Integration”)
- Paste your embed code into the code box
- Set placement to Body – end to place it before the closing body tag
- Choose whether to add it to all pages or specific pages
- Click Apply to save your changes
How to Pass User Information to Your Chatbot #
What Are User Attributes?
User attributes are pieces of personal information about your website visitors that you can pass to the chatbot. By sharing this information, your chatbot can provide a more personalized, relevant experience without requiring users to enter their details during each conversation.
Think of it like a restaurant where the staff remembers your name and preferences. Instead of treating every visitor as a stranger, your chatbot can greet them by name and tailor its responses based on who they are.
Why Add User Information?
Adding user information transforms a generic chatbot into a personalized assistant that recognizes and remembers who it’s talking to. This is similar to how a good customer service representative would greet a returning customer by name and remember their preferences.
When you pass user information to your chatbot:
- User satisfaction increases – People appreciate being recognized and remembered
- Conversations feel more personal – Users receive customized greetings and responses
- Interactions become more efficient – Users don’t need to provide information you already have
- Support becomes more relevant – Responses can be tailored based on the user’s specific situation
- Conversion rates improve – Personalized experiences typically lead to higher engagement
How It Works #
The chatbot personalization system works by passing user information from your website to the ChatbotBuilder platform through the embed code. Here’s a detailed explanation of the process:
A. Data Passing: When a visitor loads your website, the chatbot embed code executes and sends any user information you’ve defined.
B. User Recognition: Your chatbot identifies the user based on this information and customizes the conversation accordingly.
C. Personalization in Action: Instead of generic greetings like “Hello there!”, your chatbot can say “Hello John!” and reference specific details about the user throughout the conversation.
To implement this, you’ll add a user_data object to your embed code. This object contains key-value pairs representing different attributes of the user:
<script>
window.cbbSettings = {
    base_url: "https://example.chatbotbuilder.net",
    app_id: "your-app-id",
    app_type: "chat",
    user_data: {
        name: "John Doe",
        email: "john@example.com",
        phone: "+1-555-123-4567",
        address: "123 Main St, New York, NY 10001",
        company: "Acme Inc."
    }
};
</script>
<script src="https://example.chatbotbuilder.net/embed.js" defer></script>
User Attributes You Can Add
The platform supports five key attributes that cover the most essential user information. Each attribute serves a specific purpose in creating more relevant, efficient, and personalized conversations:

Technical Implementation Notes
- The data is transmitted securely via HTTPS
- Information is stored in the chatbot session
- The platform can access this data in conversation flows, decision trees, and response templates
- All attributes are optional – include only what’s relevant and available
- Attribute names are case-sensitive (
nameworks,Namedoes not) - Special characters in values should be properly escaped
When to Add User Information
Knowing when to add user information to your chatbot is just as important as knowing what information to include. The right timing ensures you’re maximizing personalization opportunities without creating technical complications. Here are the key moments when you should consider passing user data to your chatbot:
- Users are logged in: After a user successfully authenticates on your website, you have verified information about who they are. Connect your authentication system to the chatbot by adding code that passes user profile data to the ChatbotBuilder after login confirmation. Example: When a customer logs into their account on your e-commerce site, your authentication system already knows their name, email, and address. This is the perfect time to pass this information to the chatbot.
- Users complete a form: When visitors fill out forms on your website (contact forms, quote requests, subscription forms), they’re providing valuable information about themselves. Add code to your form submission process that captures the submitted data and passes it to the chatbot. Example: A visitor completes a “Request a Quote” form with their contact details. Once they submit the form, you can pass this information to the chatbot so it can provide personalized follow-up assistance.
- Returning visitors: Visitors who have been to your site before may have previously shared information that you’ve stored in cookies or local storage. When the page loads, check for existing user data in cookies or local storage, and if found, pass it to the chatbot. Example: A visitor returns to your site after previously providing their contact information. Your site recognizes them through a cookie, allowing the chatbot to greet them by name even though they haven’t logged in.
- After checkout: What this means: After a customer completes a purchase, you have both their personal information and details about what they bought. On the order confirmation page, pass both customer data and order information to the chatbot. Example: A customer has just purchased a product. On the thank-you page, the chatbot can be pre-loaded with their order details to provide immediate post-purchase support without requiring them to enter order numbers.
Real-World Use Cases
1. Ecommerce Support: When a logged-in customer opens the chatbot, it already knows their name, email address. The customer can ask “Where is my order?” and the chatbot can immediately check their status without asking for order numbers.
2. B2B Customer Service: A business client from Acme Inc. needs technical help. The chatbot recognizes their company and can immediately reference their specific product configurations, service level agreements, and assigned account manager.
3. Account Management: When users need to update their subscription or account details, the chatbot already has their contact information and can verify their identity more easily, making the process faster and more secure.
4. Appointment Scheduling: A returning patient or client wants to schedule an appointment. The chatbot already knows their name, contact details, and can access their previous appointment history to suggest appropriate times.
Important Considerations
- Privacy Compliance: Always ensure your data collection and sharing practices comply with relevant privacy regulations like GDPR or CCPA.
- User Consent: Consider whether you need explicit consent before passing certain types of user data to your chatbot.
- Data Security: Only pass user information over secure (HTTPS) connections.
- Data Minimization: Only share the information that’s actually needed for a better chatbot experience.
Troubleshooting Installation
A. Chat icon not appearing:
- Verify code is placed before
</body>tag - Check for JavaScript errors in browser console
- Ensure code is complete and unmodified
- Try clearing browser cache
B. Chat not working:
- Confirm bot is “Live” in your dashboard
- Check if there are website script conflicts
- Verify code placement and formatting
- Test in different browsers
C. Mobile display issues:
- Confirm responsive design settings
- Check mobile-specific CSS conflicts
- Test on different mobile devices
- Verify touch functionality works
Best Practices for Website Integration
A. User Experience:
- Ensure chat icon is visible but not intrusive
- Make it clear that chat support is available
- Consider page context when users might need help
- Provide offline message handling
B. Design Integration:
- Match chat colors to website theme
- Ensure chat doesn’t block important content
- Test on all device sizes
- Maintain consistent brand experience
C. Performance Considerations:
- Monitor website loading speed after installation
- Ensure chat doesn’t conflict with other scripts
- Test with various browser and device combinations
- Consider loading chat conditionally for some pages
Essential Verification Steps Before Going Live #
Before making your chatbot available to your website visitors, complete this comprehensive testing checklist to ensure everything functions properly. A thorough review now will prevent potential issues that could affect user experience later.
Appearance & Visibility
- Chat icon appears correctly on all intended pages
- Branding elements (colors, logo, welcome message) match your website design
- Chat window size and position are appropriate for both desktop and mobile layouts
- Animation effects (opening/closing) function smoothly
Functionality & Performance
- Bot responds accurately to a variety of test messages and questions
- Conversation flows progress logically without dead ends
- Mobile experience works flawlessly on different devices and screen sizes
- Page load speed remains acceptable with chatbot enabled (test with tools like Google PageSpeed)
- Memory usage stays within reasonable limits (check browser performance tools)
Technical Integrity
- No JavaScript errors appear in browser console when interacting with the chat
- No conflicts with other website scripts or functionality
- Cross-browser compatibility confirmed on Chrome, Firefox, Safari, and Edge
- User data is correctly passed to the chatbot (if using personalization features)
Integration Points
- Email notifications are delivered properly when triggered
- Calendar integrations (Calendly, Google Calendar, etc.) connect and display correctly
- CRM connections successfully capture and transfer lead information
- Live chat handoff to human agents works seamlessly (if applicable)
User Experience & Accessibility
- Chat window is keyboard accessible for users with disabilities
- Color contrast meets accessibility standards
- Text size is readable on all devices
- Focus indicators are visible when tabbing through elements
Final Verification
- Test with a real user who wasn’t involved in the setup process
- Verify that analytics tracking is properly recording conversations
- Create a backup of your configuration before going live
- Have a rollback plan in case unexpected issues arise after launch
By strategically implementing user data sharing at these key moments, you’ll create a chatbot experience that feels remarkably personal and helpful without requiring users to repeatedly provide the same information. In case you still have any questions or concerns feel free to reach out to us at Questions@Chatbotbuilder.Net and we will be happy to assist you further.